

On March 24th of 2019, I decided that I would 3D print a full scale MJOLNIR Mark VI armor from Halo 3. I have loved the Halo games since they first came out. Working at a company where I build 3D printers, I felt it would be irresponsible of me not to create my own Halo armor.
I have previously made a stormtrooper helmet (Star Wars) and a Mark VII helmet (Halo 4), but never before had I produced a full armor set. The goal was to produce the final product by Halloween of 2019, but the 3D printing trade show RAPID was coming up in less than two months and I thought I could pull it off in time to show off there. I knew that this would mean long nights and some sacrifice to my social life. I also knew that I could do it, so I got going.
Printing
The first step in the process was to find the files and print them. I was lucky enough to find that user MoeSizzlac on Thingiverse had not only posted the design of the Mark VI armor, but also had chopped up the model into 8″ x 8″ x 10″ pieces. This worked almost perfectly right out of the gate on my printer.
The model can be found here: https://www.thingiverse.com/thing:2951069
To complete the printing, I used a SAAM FFF 3D printer. The automatic part removal feature is very helpful for printing all 50+ parts involved in this job. It is nice to be able to print more than one part at a time in a series.
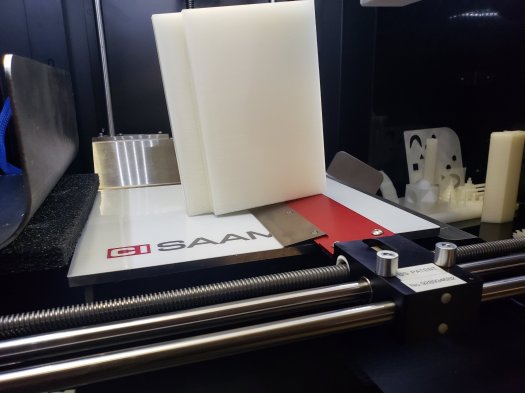
The plastic that I used was PLA from Toner Plastics, specifically PLA filament made from Natureworks 3D870 pellets. I prefer this PLA because it has higher heat resistance than many other PLA filaments which helps to prevent jamming due to softening in the hot end. It also helps afterwards when using any epoxies that may heat up, if you happen to do any of your post-processing work outside in the sun, or if you accidentally leave your prints in your car on a hot day and you don’t want them to melt.

I tried using Slic3r, Cura, and Simplify3D. In the end, Simplify3D gave me the best results: the default settings for PLA did not cause filament jams and the support material came away easily by hand or with pliers for any small nooks and crannies without leaving behind any scarring.
For my print surface, I used Geckotek. It sticks great and I do love its ability to release adhesion to the print once it is cooled down.
It is important to note that cutting corners in the printing process (support not coming away, gaps in your print, warping, etc.) that you will figure out later with extra sanding or filling adds so much extra work. It saves an enormous amount of time to spend a few extra minutes ensuring that your print settings are correct. A few verification prints to ensure you aren’t getting layer splitting and that your support material comes away cleanly are highly recommended. And definitely make sure your base layers aren’t warped!
Using the configuration above, I used the following settings:
- 230°C first layer nozzle temperature
- 200°C nozzle temperature
- 70°C bed temperature
- 3600 mm/min default speed
The settings did not need to change when switching between various colors of filament.

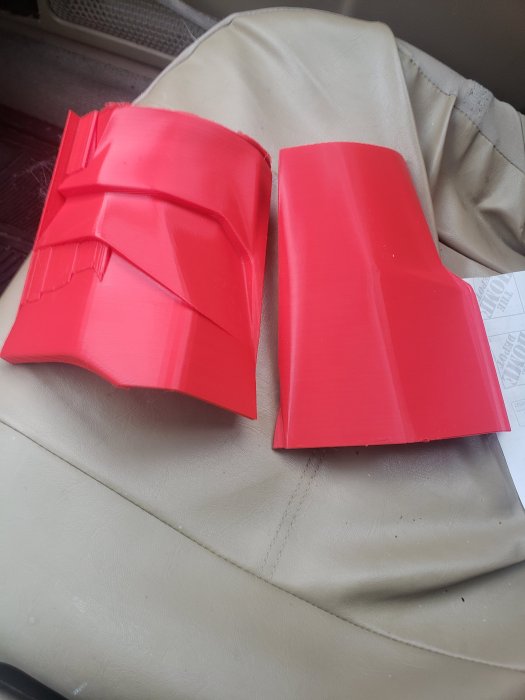
Bonding
The next step was bonding the pieces together. For past projects, I have used hot glue to stick my pieces together. This can work, but I would not recommend it: if you ever leave your parts outside on a warm day during the painting process, the glue can soften and your pieces will fall apart and require you to re-bond, re-sand, re-prime, and re-paint. It can be easier to use hot glue in the moment, but I would not recommend it for the all the extra time I have had to devote in past projects. It is also not very strong. However, it can be used for decal components as we will discuss further down.
I did find a great solution for this particular project: J-B Weld Plastic Bonder. I found this at Home Depot (my favorite store) in the adhesives section. It is a two-part epoxy that doesn’t heat up too much / at all, sets in 15 minutes, is ready to sand in 30 minutes, has strength on par with the interlayer bonds of printed PLA, is designed for plastic bonding, AND has a re-sealable cap which comes in handy. I highly recommend this for plastic bonding as it is the best solution I have found to date.

Bonding the parts can be a bit tricky: with all of these oddly shaped parts you can’t really clamp them together very well. To get my results, I would do only one or two parts at a time. First, lightly sand any mating faces that were first layers in printing: smooth surfaces will not bond well. Non-first layer mating faces will be good to go as is.
To attach the parts together with arbitrary geometries, I found that tape was key. I used duct tape for this job. Do not use painter’s tape. It will not hold together well enough. Before mixing any epoxy, prepare duct tape strips around 2-3″ in length. Get 10 ready so that you don’t need to rip them off when the epoxy is mixed since you will be in a battle against time at that point.
Next, mix just a bit of epoxy up: enough for each mating face on this is probably the size of three chick peas. Then use the applicator to apply it to both mating faces and make sure to squish it into any cracks. This will give you the best bond.

Once each face is coated with epoxy, stick them together and use the duct tape strips to hold them. You will need to get creative here and there with the orientation, but generally you can rest the parts on a surface so that the part is in a resting state where the duct tape is not actually holding any weight.

Wait extra time for epoxy to set: it is a big waste of time to have your epoxy half-way set and take off your duct tape only to have the parts fall apart from eachother. I would generally give each epoxying around 2 hours despite the instructions on the epoxy in order to ensure that it has set fully enough to go on to sanding.


Filling and Smoothing
Once all of the parts were bonded together, I began the task of filling and smoothing in order to get rid of the layer lines. For this project, I used Bondo as my filler at the start. However, I used this project as a means to experiment with other fillers and I discovered that a wonderful alternative to Bondo was simple wood putty. Bondo is a great automotive filler and I have used it to re-create parts of my car that have lasted for years without need for repair. It is overkill for this type of project. Also, it does not come out of your clothes.
I used wood putty that came in a tube from Home Depot. The tube was great because you could apply it to the applicable area directly then use a putty knife and a cloth to work it in, smooth it, and wipe off the excess. Another benefit of wood putty is that it puts off virtually no fumes whereas Bondo really requires a well-ventilated area and will put off pungent fumes well after it has set and cured.

After the filler is applied, get to sanding the parts down as smooth as possible. You may take a few cycles of sanding and re-applying more filler and this is okay. Do not count on primer or paint filling in your gaps later. You will need to sand down your primer and paint in later steps, but getting it as close as possible to smooth in this step will save you many extra iterations later on.
I recommend wet sanding: it worked way better for this application than dry sanding. Get some wet sandpaper for the store, a little bin of water, and spend time on this. You may not get it perfect, but the extra effort here pays off. I started off using a powered detail sander, but the sanding pad fell off due to the water and it did not really go any faster than doing it by hand. I ended up completing the project sanding by hand and I do not regret it: it forces you to scrutinize the details more and it was also nice to flip on Bob’s Burgers while completing this lengthy and mostly mindless task. You can’t hear the TV while a sander is on in the same room as you.
Once you have completed each sanding pass-over on each part, wash it off with a cloth and water a few times to release any leftover residue. There is immense satisfaction in washing off the wet mud slurry of paint and water and seeing a smooth part emerge.
Priming
Next step was priming. I bought combination paint and primer and I highly recommend buying a different color for the under-coat than the final coat: you will need to sand again and this helps you see how far you have sanded.
Check that the primer is compatible with plastic. In the past I have used automotive primer that was meant for metal and not plastic. That was a waste of time and money.
I did all of my painting outside. If you can do it inside in a well-ventilated area then definitely do so. Painting outside will do in a pinch, but you run the risk of working around the elements. I had to deal with wind blowing my parts around, parts getting rained on, bird feces, wind taking the paint / primer during application, and the worry about loss / theft of parts when left out overnight.


Sanding
This step doesn’t really belong here in a sequence, but it deserves its own section. Sanding needs to happen after filling, after priming, after painting, after painting, after painting, and after painting. The only way to get excellent results is to do a bunch of sanding. If you spend time on this step you can get a nearly mirror finish, but results like that do not occur without a bunch of effort plus a clear coat at the end.
I found a good value pack for this project was the 3M Pro Grade Assorted pack of purple sandpaper. This one came with 80 grit, 150 grit, and 220 grit sandpaper. The backing is durable and it works for wet sanding. I also purchased an 80 grit 3M sanding sponge for use on larger faces.
I used the 80 grit to take around 2 – 3 passes of wet sanding over the entirety of each part with special attention to any rougher spots. I applied more wood putty in areas with significantly increased roughness and alternatively sanded and re-applied wood putty up to 2 times per each of these areas.
After the 80 grit, I moved down to the 150 grit sandpaper and did another 2 -3 passes of wet sanding on each part.
I did not move all the way down to 220 grit due to the time constraints of the project. If I had more time, I would have done another 2 – 3 passes of this finer grit to finalize my sanding.
Painting
I went through quite a bit of paint for this project. I am sure I could have cut down on the coats if I had sanded more earlier on. That is a learning for next time. I got spray paint in oregano color for the undercoats and moss green for the main coat.
My best advice for getting best results while painting is to follow the instructions on the can as close as possible. Follow humidity and temperature conditions. Spray from far away and avoid getting any drips from heavy application. A greater number of lighter coats always works better than a lower number of thicker coats for quality results. Patience is a virtue.

For each coat, I would allow it to dry fully then wet sand with 220 grit sandpaper.
I first applied 2 of the oregano colored spray paint to each part to give it a good undercoat. The difference in color between undercoat and main coat and the primer was to enable me to see how much I had sanded away when wet sanding between coats. Also, it allows you to wear down some of the outer coat of paint for some neat texture effects.

Each part got 2 coats of oregano paint and then 2 coats of moss green paint. This whole process took about a week to allow for ample dry time between coats.

Although the paint dried fully in ~36 hours, the fumes would come off of it for much longer. Keeping it inside was too offensive, so I kept it on my front porch. Around 2 – 3 days of drying outside seemed to be enough for the fumes to air off to the point where the pieces could be kept inside.
After all of the colored coats were finished, I applied 2 – 3 clear coats to give the final product a nice shine and also a bit of protection from light scratching. Satin clear enamel by RUST-OLEUM was used.

Visor
The visor for the helmet took a bit more creativity to pull off. It turns out to be a bit tricky to find a piece of plastic at Home Depot or other hardware stores that suits this need. You want something easily deformable but also rigid enough to hold its shape. A 1mm thick piece of acrylic would have worked well, but I couldn’t find one anywhere. Being in a last 36 hours situation at this point, I didn’t have the time to order anything. In retrospect, it would have been better to order something from McMaster-Carr at that point but c’est la vie. The best option I have found is cannabalizing a paparazzi visor. Those are cheap, reflective, and big enough to use as a raw material for a helmet visor.

I ended up buying around 3′ x 3′ of under-carpet plastic sheeting found at Ace Hardware after asking an associate if they carried anything close to my requirements.
How to tint the visor correctly was tricky at first but then an obvious thought hit me: I have used 3D printers for years and I have a big and barely used roll of Kapton tape. A few layers of this on top of the structural plastic of the visor gave a great orange tint that I was exactly looking for!
Although I say above that hot glue is pretty useless for bonding together structural parts, it did work great for attaching a light and flexible piece of visor plastic to the inside of the helmet. For this application, hot glue works great: low set time, easy application, and any residue is easily removed.
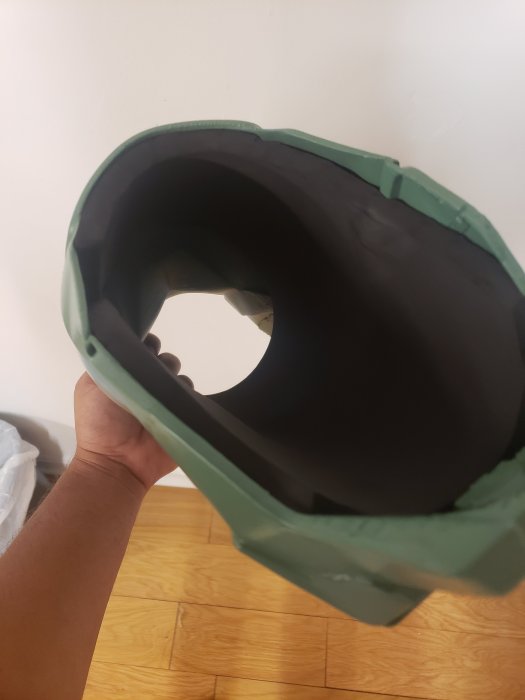
Lining
For the lining on the inside, I used EPDM foam. EPDM foam is used for cosplay project linings and worked perfectly for this one. I bought around 12′ x 3.5′ of 1/4″ foam off of McMaster-Carr which can be found here: https://www.mcmaster.com/8647K23

To cut the foam to shape, I used a black sharpy and traced the outline of each part on it. You want to form a net of the final structure, so rolling the part over the foam while tracing the profile of it works well. This will give you an over-sized net of the part which will serve as a good starting point. The extra material allows you to push it into crevices during application and also to trim down to the exact correct shape.
Once the outline of the lining was cut out, I used hot glue again to afix the foam in place. On each part I only cut one profile out of foam, So I generally had to roll the profile into a cylinder, insert it into the armor component, then unwrap it inside and work it into the nooks and crannies as much as you can. Use hot glue to fix it in place as you work it around.
Once the foam has been affixed to the part, use scissors for final trimming.
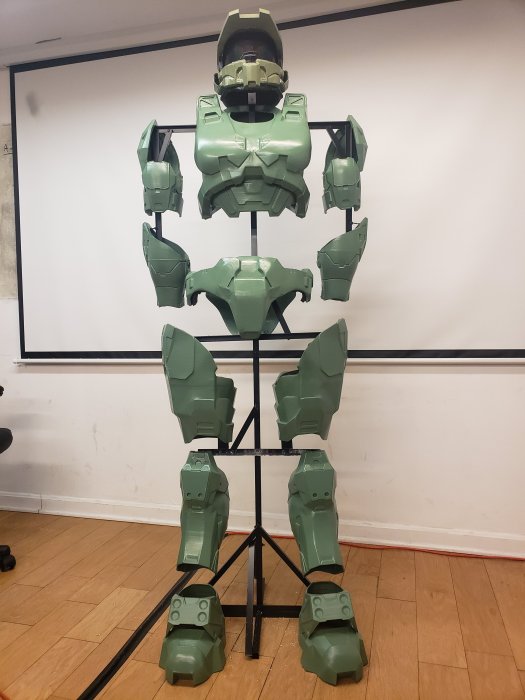
The Stand
Some people were most impressed with the stand that I built to hold everything together. In the end, I did this in a very ad-hoc and improvised way.
3/4″ box aluminum, angle aluminum, or flat stock was used to produce the entire structure of the stand.
I started with the base which ended up being 18″ wide and 18″ deep. A plus-shape was formed as the base out of box aluminum and an upright ~6′ tall protruded directly up from this base cross. To provide structural support, triangular members extended from the ends of each base member to ~12-18″ up the vertical main member.
As I went up, I searched on each part for a point where I could hang each part such that its rest state would be in the desired position. This worked well for all of the arm, leg, chest, and head components. I had to add printed protrusions to the crotch plate and the butt plate to provide features that the parts could hang from. These were 3D printed and attached with the epoxy.
As I found this location on each part, I attached more box aluminum off of the main frame piece to hold the pieces on the final stand. I drilled holes with a hand drill and used #8 nuts and bolts to hold everything together. Lock nuts weren’t needed since this would be used for display purposes only. Tightening each enough by hand ensured that it would hold together.
Once I completed the assembly of the stand, I used black spray paint to give the entire structure a final 2 -3 coats.
Conclusion
Having finished all the steps above, the product was ready to go. Since I wanted to show this off at RAPID 2019, I packed it all up in bubble wrap and sent it off to Detroit.
The armor was a hit at the show. Many people took pictures with it and offered their compliments on a neat project. I am glad that I could provide a little joy to those who have played Halo before.

A few changes I would have made for this project in retrospect:
- Spent more time ensuring no parts were warped. These gaps were more trouble than they were worth trying to fill in.
- A few more iterations of rough sanding and filling with wood putty.
- Use a paparazzi visor to form the helmet visor.
- Hinge the wrist and chest pieces so they can be worn as a costume. Maybe I will do this next.
- Spent some time on detail painting with a brush.
- Started a month earlier.
Overall this was a very fun project with a fun show-and-tell at the end. I spent quite a bit of time in the evenings and weekends completing it, but the hours of elbow grease were well worth the results. Now that RAPID is over, I plan on setting it up at my office to remind people of the amazing things we can make ourselves nowadays with inexpensive tools and materials if you put in the time. Perhaps I will spend some time hinging the wrists and chest so it can be worn for Halloween. But for now, I am off to my next project where I will be learning to make salmon jerky.
Thank you for reading. I hope that this reflection is helpful to somebody that wants to do this or a similar project even better!
chris

moesizzliac? All that work and I can’t even get my name spelled correct? Nah just pulling your chain. Looks great!
LikeLiked by 1 person
Oops! Ftfy 🙂 Thanks for stopping by, can’t believe the legend commented on my writeup!
LikeLike
Very nice. When I built mine in 03, I had to eyeball every part and hand cut all my mat board pieces before fiberglass.
Its so easy to build one today lol!
LikeLike
Chris, this looks amazing and I am very thankful you shared this. This will be a great project to do with my kids now that they’re old enough to know about Halo.
LikeLike